1. A working OS X Installation: iMacs, MacBooks, ... or
2. Retail/Beta copy of Snow Leopard
3. A HD to install Snow Leopard on, [ this is a separate HDD ]
4. Airwalk's EXTRA FOLDER
5. Airwalk's DSDT.aml - I prefer you create your own so it specifies your own hardware.
6. Chameleon RC4 Installer, or w/e the latest version is.
7. SET YOUR BIOS SETTINGS: TO ENABLE, ENABLE, AHCI MODE + IDE, AHCI MODE
9. Make sure to look at notes in the bottom & help fellow members if they struggle. i suggest reading the whole thread after the succesful install.
This installation will take about 1-3 hours tops so be patient. it'll even take a whole day if you dont know what your doing...
Before you install, change IDE to AHCI Mode.
Installation:
Step 1:
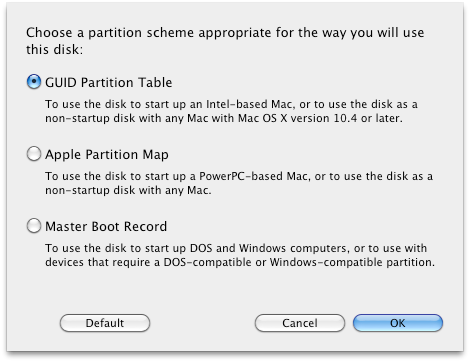
Connect the Hardrive for the Snow kitty installation: USB Enclosure or to another Sata connection, i prefer SATA because it is much faster. Once it is connected, open up Disk Utility. Click the Hardrive and format it to GUID.
|
Step 2:
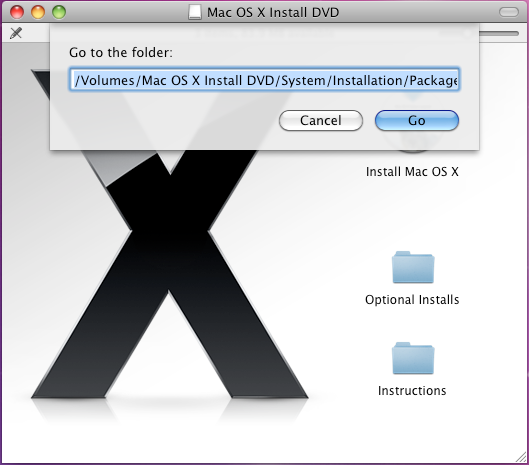
Mount/Click your Snow Leopard Install file. Once the Install window pops up, hold the these keys [ Shift + Command + G ] and enter
Code: /Volumes/Mac OS X Install DVD/System/Installation/Packages
|
Step 3:
| Install CHAMELEON into your Snow leopard hd. This is very straight forward. |
Step 4:
Now we need to install the kext files. Go get Airwalk's EXTRA folder and just copy and paste it. (replacing EXTRA folder that currently exist).
|
Step 5:
Now we need to make/edit the boot.plist file located in the EXTRA folder. Open up the apple.boot.plist and replace the text with this:
Code:
    Kernel
    mach_kernel
    Kernel Flags
    busratio=20 -x64 boot-uuid=93F4654A-DEAC-3A5D-9FB9-4AAF355BAD3D  REPLACE UUID WITH YOUR OWN UUID. You can locate your UUID by browsing to DISK UTILITY and right click on the Snow leopard hardrive and click on INFORMATION. Copy your Universal Unique Identifier and paste it where mine is.
    Graphics Mode
    1920x1200x32 REPLACE THIS WITH YOUR MONITOR RESOLUTION
    device-properties
    REPLACE THIS WITH YOUR OWN GRAPHICS CARD EFI STRING
Heres a sample of my clean boot.plist
Code:
    Kernel
    mach_kernel
    Kernel Flags
    busratio=20 -x64 boot-uuid=93F4654A-DEAC-3A5D-9FB9-4AAF355BAD3D
    Quiet Boot
    Yes
    GUI
    No
    Graphics Mode
    1920x1200x32
    device-properties
d10300000100000001000000c50300001500000002010c00d041030a010000000101060000070101060000007fff040014000000400032002c006e0061006d00650000001100000073656e736f722d706172656e74220000005600520041004d002c0074006f00740061006c00730069007a0065000000080000000000002036000000400032002c00680077006300740072006c002d0070006100720061006d0073002d00760065007200730069006f006e00000008000000000000021c0000006400650076006900630065005f0074007900700065000000100000004e5644412c4765466f7263650e0000006e0061006d00650000000f0000004e5644412c506172656e7422000000400030002c006400650076006900630065005f00740079007000650000000b000000646973706c6179100000006d006f00640065006c0000001e0000004e5649444941204765466f72636520393830302047542044444c22000000400031002c006400650076006900630065005f00740079007000650000000b000000646973706c617912000000400032002c007200650067000000080000000000000222000000400032002c006400650076006900630065005f0074007900700065000000120000004e5644412c6770752d64696f646520000000400032002c0063006f006d00700061007400690062006c0065000000160000004e5644412c73656e736f722d706172656e7422000000400032002c002300730069007a0065002d00630065006c006c0073000000080000000000000020000000400031002c0063006f006d00700061007400690062006c00650000000e0000004e5644412c4e564d616314000000400030002c006e0061006d0065000000120000004e5644412c446973706c61792d413a000000400032002c0068007700730065006e0073006f0072002d0070006100720061006d0073002d00760065007200730069006f006e000000080000000000000226000000400032002c0023006100640072006500730073002d00630065006c006c0073000000080000000000000114000000400031002c006e0061006d0065000000120000004e5644412c446973706c61792d4220000000400030002c0063006f006d00700061007400690062006c00650000000e0000004e5644412c4e564d61631e00000072006f006d002d007200650076006900730069006f006e000000090000003331373261100000004e00560043004100500000001800000004000000000003000c00000000000007000000000e0000004e00560050004d0000002000000001000000000000000000000000000000000000000000000000000000 |
Step 6:
If you dont want to create your DSDT.aml file, get AIRWALK's dsdt.aml file and just place it in your EXTRA FOLDER.
You need to generate and compile/Edit your own DSDT.aml file so there wont be any complications on using others DSDT file. Copy/Paste it to EXTRA Folder
Creating DSDT.aml
http://osx86.co/f84/a-quick-guide-to-dsdt-t3436/
DSDT Auto-Patcher - does the steps in the bottom with a program, so you dont need to do it manually.
http://www.insanelymac.com/forum/ind...owtopic=235523
Quoted from SaCleoCheater:
Step 3: DSDT. Your going to need a modded DSDT to stop the annoying CMOS reset bug.
Download iasl and extract it to /usr/bin on your CURRENT BOOTED VOLUME! - This will allow modification of a compiled DSDT.
once you have your DSDT.aml located in the root of your volume, open Terminal..
Code:
sudo -s
iasl -d /Path/to/dsdt.aml
You should have a dsdt.dsl located in / now, that is decompiled and editable.
open dsdt.dsl and search for "RTC"/ Find Code:
0x08 //Length
below "Device (RTC)" or "Device (RTC0" and replace the "8" (or whatever number it may be) with a "2". So it looks something like this: Code:
0x02 //Length
. here's what it should fully look like:
Code:
}
Device (RTC)
{
Name (_HID, EisaId ("PNP0B00"))
Name (_CRS, ResourceTemplate ()
{
IO (Decode16,
0x0070, // Range Minimum
0x0070, // Range Maximum
0x01, // Alignment
0x02, // Length
)
})
}
Save it, and run the following through terminal:
Code:
sudo -s
iasl -ta /Path/to/dsdt.dsl
You should now have a compiled DSDT.aml located in /. Copy it to the EXTRA folder of your Snow Leopard volume. |
|
Step 7:
Now you need a SMbios.plist to edit your system profiler information. just edit the UUID so it matches your system uuid's like the hardrive.
Code:
    SMUUID
    96DA8127-73E2-3405-80DF-1A3ED8699FBA
    SMbiosdate
    2/29/2008
    SMbiosvendor
    Apple Inc.
    SMbiosversion
    MP31.88Z.00C1.B00.0802091544
    SMboardmanufacturer
    Apple Computer, Inc.
    SMboardproduct
    Mac-F42C88C8
    SMfamily
    MacPro
    SMmanufacturer
    Apple Inc.
    SMmemmanufacter
    OCZ
    SMmempart
    OCZ3P1600LV6GK
    SMmemserial_1
    000123-01234567-0
    SMmemserial_2
    EMPTY
    SMmemserial_3
    000123-01234567-1
    SMmemserial_4
    EMPTY
    SMmemserial_5
    000123-01234567-2
    SMmemserial_6
    EMPTY
    SMmemspeed
    1600
    SMmemtype
    24
    SMproductname
    Mac Pro 4,1
    SMserial
    CK034KMHK5B
    SMsystemversion
1.0 |
Step 8:
Now we can reboot. Just boot the Snow Leopard HD and it will play the snow leopard intro. to skip registration, press [ Command + Q ] and skip.
if it doesnt boot try [ -v -f ] |
Step 9:
Instructions:
Download AppleHDA.kext
Open Terminal and type these commands:
sudo cp -R AppleHDA.kext /System/Library/Extensions/
sudo chown -R root:wheel /System/Library/Extensions/AppleHDA.kext
sudo chmod -R 755 /System/Library/Extensions/AppleHDA.kext
Wait about 15 minutes (kextcache needs to rebuild) or use pfix to manually rebuild cache, then reboot and you should have audio back!
Notice: You might need to manually remove caches, use this command: sudo rm -rf /system/Library/Caches/com.apple.kext.caches